开源软件名称:joplin
开源软件地址:https://gitee.com/yanbog/joplin
开源软件介绍:
   
 Joplin is a free, open source note taking and to-do application, which can handle a large number of notes organised into notebooks. The notes are searchable, can be copied, tagged and modified either from the applications directly or from your own text editor. The notes are in Markdown format. Joplin is a free, open source note taking and to-do application, which can handle a large number of notes organised into notebooks. The notes are searchable, can be copied, tagged and modified either from the applications directly or from your own text editor. The notes are in Markdown format.
Notes exported from Evernote via .enex files can be imported into Joplin, including the formatted content (which is converted to Markdown), resources (images, attachments, etc.) and complete metadata (geolocation, updated time, created time, etc.). Plain Markdown files can also be imported. The notes can be synchronised with various cloud services including Nextcloud, Dropbox, OneDrive, WebDAV or the file system (for example with a network directory). When synchronising the notes, notebooks, tags and other metadata are saved to plain text files which can be easily inspected, backed up and moved around. The application is available for Windows, Linux, macOS, Android and iOS (the terminal app also works on FreeBSD). A Web Clipper, to save web pages and screenshots from your browser, is also available for Firefox and Chrome. InstallationThree types of applications are available: for desktop (Windows, macOS and Linux), for mobile (Android and iOS) and for terminal (Windows, macOS, Linux and FreeBSD). All the applications have similar user interfaces and can synchronise with each other. Desktop applications| Operating System | Download |
|---|
| Windows (32 and 64-bit) |  | | macOS |  | | Linux |  |
On Windows, you may also use the Portable version. The portable application allows installing the software on a portable device such as a USB key. Simply copy the file JoplinPortable.exe in any directory on that USB key ; the application will then create a directory called "JoplinProfile" next to the executable file. On Linux, the recommended way is to use the following installation script as it will handle the desktop icon too: wget -O - https://raw.githubusercontent.com/laurent22/joplin/dev/Joplin_install_and_update.sh | bash Mobile applications| Operating System | Download | Alt. Download |
|---|
| Android |  | or download the APK file: 64-bit 32-bit | | iOS |  | - |
Terminal application| Operating system | Method |
|---|
| macOS, Linux, or Windows (via WSL) | Important: First, install Node 12+.
NPM_CONFIG_PREFIX=~/.joplin-bin npm install -g joplin
sudo ln -s ~/.joplin-bin/bin/joplin /usr/bin/joplin
By default, the application binary will be installed under ~/.joplin-bin. You may change this directory if needed. Alternatively, if your npm permissions are setup as described here (Option 2) then simply running npm -g install joplin would work. |
To start it, type joplin. For usage information, please refer to the full Joplin Terminal Application Documentation. Unsupported methodsThere are other ways to install the terminal application. However, they are not supported and problems must be reported to the upstream projects. | Operating system | Method |
|---|
| Arch Linux | An Arch Linux package is available here. To install it, use an AUR wrapper such as yay: yay -S joplin. Both the CLI tool (type joplin) and desktop app (type joplin-desktop) are packaged. You can also install a compiled version with the chaotic-aur repository. For support, please go to the GitHub repo. If you are interested in pre-release you have joplin-beta. |
Web ClipperThe Web Clipper is a browser extension that allows you to save web pages and screenshots from your browser. For more information on how to install and use it, see the Web Clipper Help Page. Sponsors   
Table of contentsFeatures- Desktop, mobile and terminal applications.
- Web Clipper for Firefox and Chrome.
- End To End Encryption (E2EE).
- Note history (revisions).
- Synchronisation with various services, including Nextcloud, Dropbox, WebDAV and OneDrive.
- Offline first, so the entire data is always available on the device even without an internet connection.
- Import Enex files (Evernote export format) and Markdown files.
- Export JEX files (Joplin Export format) and raw files.
- Support notes, to-dos, tags and notebooks.
- Sort notes by multiple criteria - title, updated time, etc.
- Support for alarms (notifications) in mobile and desktop applications.
- Markdown notes, which are rendered with images and formatting in the desktop and mobile applications. Support for extra features such as math notation and checkboxes.
- Choice of both Markdown and Rich Text (WYSIWYG) editors.
- File attachment support - images are displayed, other files are linked and can be opened in the relevant application.
- Inline display of PDF, video and audio files.
- Goto Anything feature.
- Search functionality.
- Geo-location support.
- Supports multiple languages.
- External editor support - open notes in your favorite external editor with one click in Joplin.
- Extensible functionality through plugin and data APIs.
- Custom CSS support for customisation of both the rendered markdown and overall user interface.
- Customisable layout allows toggling, movement and sizing of various elements.
- Keyboard shortcuts are editable and allow binding of most Joplin commands with export/import functionality.
ImportingImporting from EvernoteJoplin was designed as a replacement for Evernote and so can import complete Evernote notebooks, as well as notes, tags, resources (attached files) and note metadata (such as author, geo-location, etc.) via ENEX files. In terms of data, the only two things that might slightly differ are: Recognition data - Evernote images, in particular scanned (or photographed) documents have recognition data associated with them. It is the text that Evernote has been able to recognise in the document. This data is not preserved when the note are imported into Joplin. However, should it become supported in the search tool or other parts of Joplin, it should be possible to regenerate this recognition data since the actual image would still be available. Colour, font sizes and faces - Evernote text is stored as HTML and this is converted to Markdown during the import process. For notes that are mostly plain text or with basic formatting (bold, italic, bullet points, links, etc.) this is a lossless conversion, and the note, once rendered back to HTML should be very similar. Tables are also imported and converted to Markdown tables. For very complex notes, some formatting data might be lost - in particular colours, font sizes and font faces will not be imported. The text itself however is always imported in full regardless of formatting. If it is essential that this extra data is preserved then Joplin also allows import of ENEX files as HTML.
To import Evernote data, first export your Evernote notebooks to ENEX files as described here. Then follow these steps: In the desktop application, open File > Import > ENEX and select your file. The notes will be imported into a new separate notebook. If needed they can then be moved to a different notebook, or the notebook can be renamed, etc. In the terminal application, in command-line mode, type import /path/to/file.enex. This will import the notes into a new notebook named after the filename. Importing from Markdown filesJoplin can import notes from plain Markdown file. You can either import a complete directory of Markdown files or individual files. In the desktop application: - File import: Go to File > Import > MD - Markdown (file) and select the Markdown file. This file will then be imported to the currently selected Notebook.
- Directory import: Go to File > Import > MD - Markdown (directory) and select the top level of the directory that is being imported. Directory (folder) structure will be preserved in the Notebook > Subnotebook > Note structure within Joplin.
In the terminal application, in command-line mode, type import --format md /path/to/file.md or import --format md /path/to/directory/. Importing from other applicationsIn general the way to import notes from any application into Joplin is to convert the notes to ENEX files (Evernote format) and to import these ENEX files into Joplin using the method above. Most note-taking applications support ENEX files so it should be relatively straightforward. For help about specific applications, see below: ExportingJoplin can export to the JEX format (Joplin Export file), which is a tar file that can contain multiple notes, notebooks, etc. This is a lossless format in that all the notes, but also metadata such as geo-location, updated time, tags, etc. are preserved. This format is convenient for backup purposes and can be re-imported into Joplin. A "raw" format is also available. This is the same as the JEX format except that the data is saved to a directory and each item represented by a single file.Joplin is also capable of exporting to a number of other formats including HTML and PDF which can be done for single notes, notebooks or everything. SynchronisationOne of the goals of Joplin is to avoid being tied to any particular company or service, whether it is Evernote, Google or Microsoft. As such the synchronisation is designed without any hard dependency to any particular service. Most of the synchronisation process is done at an abstract level and access to external services, such as Nextcloud or Dropbox, is done via lightweight drivers. It is easy to support new services by creating simple drivers that provide a filesystem-like interface, i.e. the ability to read, write, delete and list items. It is also simple to switch from one service to another or to even sync to multiple services at once. Each note, notebook, tags, as well as the relation between items is transmitted as plain text files during synchronisation, which means the data can also be moved to a different application, can be easily backed up, inspected, etc. Currently, synchronisation is possible with Nextcloud, WebDAV, Dropbox, OneDrive or the local filesystem. To enable synchronisation please follow the instructions below. After that, the application will synchronise in the background whenever it is running, or you can click on "Synchronise" to start a synchronisation manually. Joplin will background sync automatically after any content change is made on the local application. If the terminal client has been installed, it is possible to also synchronise outside of the user interface by typing joplin sync from the terminal. This can be used to setup a cron script to synchronise at a regular interval. For example, this would do it every 30 minutes: */30 * * * * /path/to/joplin sync
Nextcloud synchronisation Nextcloud is a self-hosted, private cloud solution. It can store documents, images and videos but also calendars, passwords and countless other things and can sync them to your laptop or phone. As you can host your own Nextcloud server, you own both the data on your device and infrastructure used for synchronisation. As such it is a good fit for Joplin. The platform is also well supported and with a strong community, so it is likely to be around for a while - since it's open source anyway, it is not a service that can be closed, it can exist on a server for as long as one chooses. Nextcloud is a self-hosted, private cloud solution. It can store documents, images and videos but also calendars, passwords and countless other things and can sync them to your laptop or phone. As you can host your own Nextcloud server, you own both the data on your device and infrastructure used for synchronisation. As such it is a good fit for Joplin. The platform is also well supported and with a strong community, so it is likely to be around for a while - since it's open source anyway, it is not a service that can be closed, it can exist on a server for as long as one chooses.
In the desktop application or mobile application, go to the Configuration screen and select Nextcloud as the synchronisation target. Then input the WebDAV URL (to get it, click on Settings in the bottom left corner of the page, in Nextcloud), this is normally https://example.com/nextcloud/remote.php/webdav/Joplin (make sure to create the "Joplin" directory in Nextcloud), and set the username and password. If it does not work, please see this explanation for more details. In the terminal application, you will need to set the sync.target config variable and all the sync.5.path, sync.5.username and sync.5.password config variables to, respectively the Nextcloud WebDAV URL, your username and your password. This can be done from the command line mode using: :config sync.5.path https://example.com/nextcloud/remote.php/webdav/Joplin:config sync.5.username YOUR_USERNAME:config sync.5.password YOUR_PASSWORD:config sync.target 5 If synchronisation does not work, please consult the logs in the app profile directory - it is often due to a misconfigured URL or password. The log should indicate what the exact issue is. WebDAV synchronisationSelect the "WebDAV" synchronisation target and follow the same instructions as for Nextcloud above (for the terminal application you will need to select sync target 6 rather than 5) WebDAV-compatible services that are known to work with Joplin: Dropbox synchronisationWhen syncing with Dropbox, Joplin creates a sub-directory in Dropbox, in /Apps/Joplin and read/write the notes and notebooks from it. The application does not have access to anything outside this directory. In the desktop application or mobile application, select "Dropbox" as the synchronisation target in the Configuration screen (it is selected by default). Then, to initiate the synchronisation process, click on the "Synchronise" button in the sidebar and follow the instructions. In the terminal application, to initiate the synchronisation process, type :sync. You will be asked to follow a link to authorise the application. OneDrive synchronisationWhen syncing with OneDrive, Joplin creates a sub-directory in OneDrive, in /Apps/Joplin and read/write the notes and notebooks from it. The application does not have access to anything outside this directory. In the desktop application or mobile application, select "OneDrive" as the synchronisation target in the Configuration screen. Then, to initiate the synchronisation process, click on the "Synchronise" button in the sidebar and follow the instructions. In the terminal application, to initiate the synchronisation process, type :sync. You will be asked to follow a link to authorise the application (simply input your Microsoft credentials - you do not need to register with OneDrive). S3 synchronisationAs of Joplin 2.x.x, Joplin supports multiple S3 providers. We expose some options that will need to be configured depending on your provider of choice. We have tested with UpCloud, AWS, and Linode. others should work as well. In the desktop application or mobile application, select "S3 (Beta)" as the synchronisation target in the Configuration screen. - S3 Bucket: The name of your Bucket, such as
joplin-bucket - S3 URL: Fully qualified URL; For AWS this should be
https://s3.amazonaws.com/ - S3 Access Key & S3 Secret Key: The User's programmatic access key. To create a new key & secret on AWS, visit IAM Security Credentials. For other providers follow their documentation.
- S3 Region: Some providers require you to provide the region of your bucket. This is usually in the form of "eu-west1" or something similar depending on your region. For providers that do not require a region, you can leave it blank.
- Force Path Style: This setting enables Joplin to talk to S3 providers using an older style S3 Path. Depending on your provider you may need to try with this on and off.
While creating a new Bucket for Joplin, disable Bucket Versioning, enable Block all public access and enable Default encryption with Amazon S3 key (SSE-S3). Some providers do not expose these options, and it could create a syncing problem. Do attempt and report back so we can update the documentation appropriately. To add a Bucket Policy from the AWS S3 Web Console, navigate to the Permissions tab. Temporarily disable Block all public access to edit the Bucket policy, something along the lines of: { "Version": "2012-10-17", "Statement": [ { "Sid": "VisualEditor0", "Effect": "Allow", "Principal": "*", "Action": [ "s3:ListBucket", "s3:GetBucketLocation", "s3:DeleteObject", "s3:DeleteObjectVersion", "s3:PutObject" ], "Resource": [ "arn:aws:s3:::joplin-bucket", "arn:aws:s3:::joplin-bucket/*" ] } ]}Configuration settings for tested providersAll providers will require a bucket, Access Key, and Secret Key. If you provide a configuration and you receive "success!" on the "check config" then your S3 sync should work for your provider. If you do not receive success, you may need to adjust your settings, or save them, restart the app, and attempt a sync. This may reveal more clear error messaging that will help you deduce the problem. AWSLinode- URL: https://.linodeobjects.com
- Region: empty
- Force Path Style: unchecked
UpCloud- URL: https://..upcloudobjects.com (They will provide you with multiple URLs, the one that follows this pattern should work.)
- Region: required
- Force Path Style: unchecked
EncryptionJoplin supports end-to-end encryption (E2EE) on all the applications. E2EE is a system where only the owner of the notes, notebooks, tags or resources can read them. It prevents potential eavesdroppers - including telecom providers, internet providers, and even the developers of Joplin from being able to access the data. Please see the End-To-End Encryption Tutorial for more information about this feature and how to enable it. For a more technical description, mostly relevant for development or to review the method being used, please see the Encryption specification. Note historyThe Joplin applications automatically save previous versions of your notes at regular intervals. These versions are synced across devices and can be viewed from the desktop application. To do so, click on the "Information" button on a note, then click on "Previous version of this note". From this screen you can view the previous versions of the note as well as restore any of them. This feature can be disabled from the "Note history" section in the Configuration screen, and it is also possible to change for how long the history of a note is saved. More information please see the Note History page. External text editorJoplin notes can be opened and edited using an external editor of your choice. It can be a simple text editor like Notepad++ or Sublime Text or an actual Markdown editor like Typora. In that case, images will also be displayed within the editor. To open the note in an external editor, click on the icon in the toolbar or press Ctrl+E (or Cmd+E). Your default text editor will be used to open the note. If needed, you can also specify the editor directly in the General Options, under "Text editor command". AttachmentsAny kind of file can be attached to a note. In Markdown, links to these files are represented as a simple ID to the attachment, clicking on this link will open the file in the default application. In the case of audio, video and pdf files, these will be displayed inline with the note and so can be viewed or played within Joplin. In the desktop application, files can be attached either by clicking the "Attach file" icon in the editor or via drag and drop. If you prefer to create a link to a local file instead, hold the ALT key while performing the drag and drop operation. You can also copy and paste images directly in the editor via Ctrl+V. Resources that are not attached to any note will be automatically deleted in accordance to the Note History settings. Important: Resources larger than 10 MB are not currently supported on mobile. They will crash the application when synchronising so it is recommended not to attach such resources at the moment. The issue is being looked at. Downloading attachmentsThe way the attachments are downloaded during synchronisation can be customised in the Configuration screen, under "Attachment download behaviour". The default option ("Always") is to download all the attachments, all the time, so that the data is available even when the device is offline. There is also the option to download the attachments manually (option "Manual"), by clicking on it, or automatically (Option "Auto"), in which case the attachments are downloaded only when a note is opened. These options should help saving disk space and network bandwidth, especially on mobile. NotificationsIn the desktop and mobile apps, an alarm can be associated with any to-do. It will be triggered at the given time by displaying a notification. How the notification will be displayed depends on the operating system since each has a different way to handle this. Please see below for the requirements for the desktop applications: - Windows: >= 8. Make sure the Action Center is enabled on Windows. Task bar balloon for Windows < 8. Growl as fallback. Growl takes precedence over Windows balloons.
- macOS: >= 10.8 or Growl if earlier.
- Linux:
notify-send tool, delivered through packages notify-osd, libnotify-bin or libnotify-tools. GNOME should have this by default, but install libnotify-tools if using KDE Plasma.
See documentation and flow chart for reporter choice On mobile, the alarms will be displayed using the built-in notification system. If for any reason the notifications do not work, please open an issue. Sub-notebooksSub-notebooks allow organising multiple notebooks into a tree of notebooks. For example it can be used to regroup all the notebooks related to work, to family or to a particular project under a parent notebook. 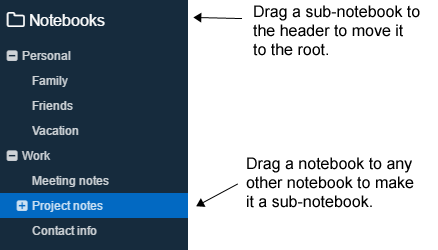
- In the desktop application, to create a subnotebook, drag and drop it onto another notebook. To move it back to the root, drag and drop it on the "Notebooks" header. Currently only the desktop app can be used to organise the notebooks.
- The mobile application supports displaying and collapsing/expanding the tree of notebooks, however it does not currently support moving the subnotebooks to different notebooks.
- The terminal app supports displaying the tree of subnotebooks but it does not support collapsing/expanding them or moving the subnotebooks around.
MarkdownJoplin uses and renders a Github-flavoured Markdown with a few variations and additions. In particular it adds math formula support, interactive checkboxes and support for note links. Joplin also supports Markdown plugins which allow enabling and disabling various advanced Markdown features. Have a look at the Markdown Guide for more information. Custom CSSRendered markdown can be customized by placing a userstyle file in the profile directory ~/.config/joplin-desktop/userstyle.css (This path might be different on your device - check at the top of the General page of the Configuration screen for the exact path). This file supports standard CSS syntax. Joplin must be restarted for the new css to be applied, please ensure that Joplin is not closing to the tray, but is actually exiting. Note that this file is used for both displaying the notes and printing the notes. Be aware how the CSS may look printed (for example, printing white text over a black background is usually not wanted). The whole UI can be customized by placing a custom editor style file in the profile directory ~/.config/joplin-desktop/userchrome.css. Important: userstyle.css and userchrome.css are provided for your convenience, but they are advanced settings, and styles you define may break from one version to the next. If you want to use them, please know that it might require regular development work from you to keep them working. The Joplin team cannot make a commitment to keep the application HTML structure stable. PluginsThe desktop app has the ability to extend beyond its standard functionality by the way of plugins. These plugins adhere to the Joplin plugin API and can be installed & configured within the application via the Plugins page in the Configuration screen. This menu allows the manual installation of the plugin using the single 'Joplin Plugin Archive' (*.jpl) file. Once the application is reloaded the plugins will appear within the plugins menu where they can be toggled on/off or removed entirely. Plugins are currently maintained by the community in the Joplin Discourse 'plugins' category. For more information see Plugins SearchingJoplin implements the SQLite Full Text Search (FTS4) extension. It means the content of all the notes is indexed in real time and search queries return results very fast. Both Simple FTS Queries and Full-Text Index Queries are supported. See below for the list of supported queries: One caveat of SQLite FTS is that it does not support languages which do not use Latin word boundaries (spaces, tabs, punctuation). To solve this issue, Joplin has a custom search mode, that does not use FTS, but still has all of its features (multi term search, filters, etc.). One of its drawbacks is that it can get slow on larger note collections. Also, the sorting of the results will be less accurate, as the ranking algorithm (BM25) is, for now, only implemented for FTS. Finally, in this mode there are no restrictions on using the * wildcard (swim*, *swim and ast*rix all work). This search mode is currently enabled if one of the following languages are detected: - Chinese
- Japanese
- Korean
- Thai
Supported queries| Search type | Description | Example |
|---|
| Single word | Returns all the notes that contain this term. | For example, searching for cat will return all the notes that contain this exact word. Note: it will not return the notes that contain the substring - thus, for "cat", notes that contain "cataclysmic" or "prevaricate" will not be returned. | | Multiple word | Returns all the notes that contain all these words, but not necessarily next to each other. | dog cat - will return any notes that contain the words "dog" and "cat" anywhere in the note, no necessarily in that order nor next to each other. It will not return results that contain "dog" or "cat" only. | | Phrase | Add double quotes to return the notes that contain exactly this phrase. | "shopping list" - will return the notes that contain these exact terms next to each other and in this order. It will not return for example a note that contains "going shopping with my list". | | Prefix | Add a wildcard to return all the notes that contain a term with a specified prefix. | swim* - will return all the notes that contain eg. "swim", but also "swimming", "swimsuit", etc. IMPORTANT: The wildcard can only be at the end - it will be ignored at the beginning of a word (eg. *swim) and will be treated as a literal asterisk in the middle of a word (eg. ast*rix) | | Switch to basic search | One drawback of Full Text Search is that it ignores most non-alphabetical characters. However in some cases you might want to search for this too. To do that, you can use basic search. You switch to this mode by prefixing your search with a slash /. This won't provide the benefits of FTS but it will allow searching exactly for what you need. Note that it can also be much slower, even extremely slow, depending on your query. | /"- [ ]" - will return all the notes that contain unchecked checkboxes. |
Search filtersYou can also use search filters to further restrict the search. | Operator | Description | Example |
|---|
| - | If placed before a text term, it excludes the notes that contain that term. You can also place it before a filter to negate it. | -spam searches for all notes without the word spam.
office -trash searches for all notes with the wordoffice and without the word trash. | | any: | Return notes that satisfy any/all of the required conditions. any:0 is the default, which means all conditions must be satisfied. | any:1 cat dog will return notes that have the word cat or dog.
any:0 cat dog will return notes with both the words cat and dog. | title:
body: | Restrict your search to just the title or the body field. | title:"hello world" searches for notes whose title contains hello and world.
title:hello -body:world searches for notes whose title contains hello and body does not contain world. | | tag: | Restrict the search to the notes with the specified tags. | tag:office searches for all notes having tag office.
tag:office tag:important searches for all notes having both office and important tags.
tag:office -tag:spam searches for notes having tag office which do not have tag spam.
any:1 tag:office tag:spam searches for notes having tag office or tag spam.
tag:be*ful does a search with wildcards.
tag:* returns all notes with tags.
-tag:* returns all notes without tags. | | notebook: | Restrict the search to the specified notebook(s). | notebook:books limits the search scope within books and all its subnotebooks.
notebook:wheel*time does a wildcard search. | created:
updated:
due: | Searches for notes created/updated on dates specified using YYYYMMDD format. You can also search relative to the current day, week, month, or year. | created:20201218 will return notes created on or after December 18, 2020.
-updated:20201218 will return notes updated before December 18, 2020.
created:20200118 -created:20201215 will return notes created between January 18, 2020, and before December 15, 2020.
created:202001 -created:202003 will return notes created on or after January and before March 2020.
updated:1997 -updated:2020 will return all notes updated between the years 1997 and 2019.
created:day-2 searches for all notes created in the past two days.
updated:year-0 searches all notes updated in the current year.
-due:day+7 will return all todos which are due or will be due in the next seven days.
-due:day-5 searches all todos that are overdue for more than 5 days. | | type: | Restrict the search to either notes or todos. | type:note to return all notes
type:todo to return all todos | | iscompleted: | Restrict the search to either completed or uncompleted todos. | iscompleted:1 to return all completed todos
iscompleted:0 to return all uncompleted todos | latitude:
longitude:
altitude: | Filter by location | latitude:40 -latitude:50 to return notes with latitude >= 40 and < 50 | | resource: | Filter by attachment MIME type | resource:image/jpeg to return notes with a jpeg attachment.
-resource:application/pdf to return notes without a pdf attachment.
resource:image/* to return notes with any images. | | sourceurl: | Filter by source URL | sourceurl:https://www.google.com
sourceurl:*joplinapp.org to perform a wildcard search. | | id: | Filter by note ID | id:9cbc1b4f242043a9b8a50627508bccd5 return a note with the specified id |
Note: In the CLI client you have to escape the query using -- when using negated filters.Eg. :search -- "-tag:tag1". The filters are implicitly connected by and/or connectives depending on the following rules: - By default, all filters are connected by "AND".
- To override this default behaviour, use the
any filter, in which case the search terms will be connected by "OR" instead. - There's an exception for the
notebook filters which are connected by "OR". The reason being that no note can be in multiple notebooks at once.
Incorrect search filters are interpreted as a phrase search, e.g. misspelled nootebook:Example or non-existing https://joplinapp.org. Search orderNotes are sorted by "relevance". Currently it means the notes that contain the requested terms the most times are on top. For queries with multiple terms, it also matters how close to each other the terms are. This is a bit experimental so if you notice a search query that returns unexpected results, please report it in the forum, providing as many details as possible to replicate the issue. Goto AnythingIn the desktop application, press Ctrl+P or Cmd+P and type a note title or part of its content to jump to it. Or type # followed by a tag name, or @ followed by a notebook name. PrivacyJoplin values your privacy and security by giving you complete control over your information and digital footprint. Joplin applications do not send any data to any service without your authorisation. Any data that Joplin saves, such as notes or images, are saved to your own device and you are free to delete this data at any time. Joplin has many modern features, some of which use third-party services. You can disable any or all of these features in the application settings. These features are: | Feature | Description | Default |
|---|
| Auto-update | Joplin periodically connects to GitHub to check for new releases. | Enabled | | Geo-location | Joplin saves geo-location information in note properties when you create a note. | Enabled | | Synchronisation | Joplin supports synchronisation of your notes across multiple devices. If you choose to synchronise with a third-party, such as OneDrive, the notes will be sent to your OneDrive account, in which case the third-party privacy policy applies. | Disabled |
Joplin is developed as an open-source application and the source code is freely available online to inspect. For any question about Joplin privacy, please leave a message on the Joplin Forum. DonationsDonations to Joplin support the development of the project. Developing quality applications mostly takes time, but there are also some expenses, such as digital certificates to sign the applications, app store fees, hosting, etc. Most of all, your donation will make it possible to keep up the current development standard. Please see the donation page for information on how to support the development of Joplin. Community| Name | Description |
|---|
| Support Forum | This is the main place for general discussion about Joplin, user support, software development questions, and to discuss new features. Also where the latest beta versions are released and discussed. | | Twitter feed | Follow us on Twitter | | Mastodon feed | Follow us on Mastodon | | Patreon page | The latest news are often posted there | | Discord server | Our chat server | | Sub-reddit | Also a good place to get help |
ContributingPlease see the guide for information on how to contribute to the development of Joplin: https://github.com/laurent22/joplin/blob/dev/CONTRIBUTING.md LocalisationJoplin is currently available in the languages below. If you would like to contribute a new translation, it is quite straightforward, please follow these steps: - Download Poedit, the translation editor, and install it.
- Download the file to be translated.
- In Poedit, open this .pot file, go into the Catalog menu and click Configuration. Change "Country" and "Language" to your own country and language.
- From then you can translate the file.
- Once it is done, please open a pull request and add the file to it.
This translation will apply to the three applications - desktop, mobile and terminal. To update a translation, follow the same steps as above but instead of getting the .pot file, get the .po file for your language from the table below. Current translations: | 
 客服电话
客服电话
 APP下载
APP下载

 官方微信
官方微信


请发表评论